Are you dreaming of hosting backyard barbecues and outdoor dinner parties at your own custom-made outdoor kitchen? Imagine a well-designed space where you can seamlessly whip up delicious meals while socializing with friends and family — sounds fantastic, right? Look no further! This article will guide you through the steps to create the perfect outdoor kitchen that caters to your needs and style.
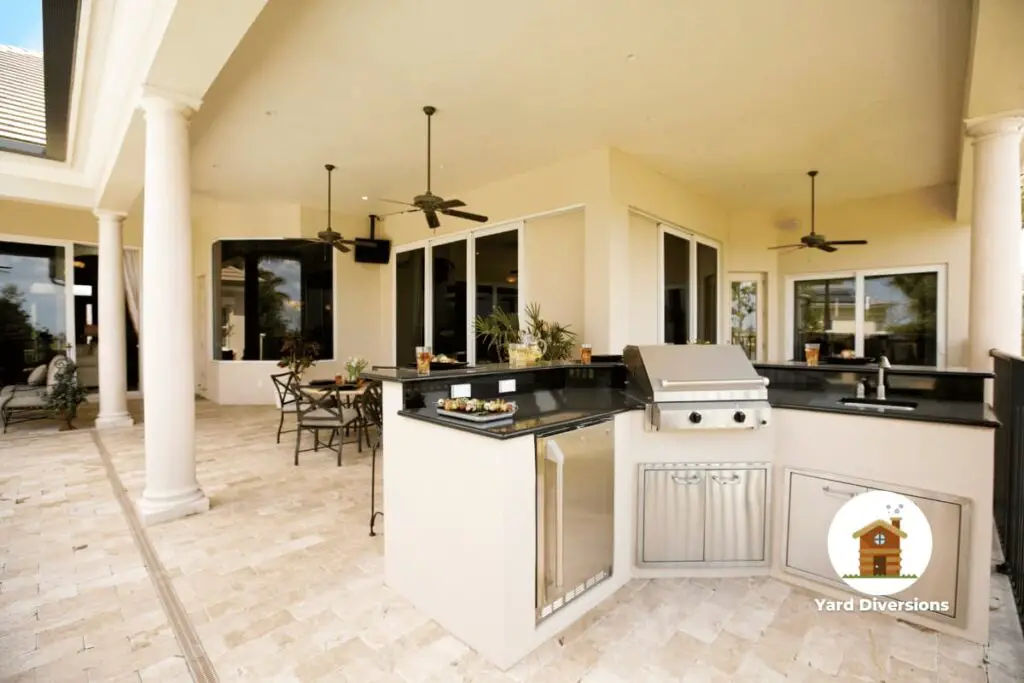
Outdoor kitchens offer a fantastic opportunity to expand your living and entertaining space. They can feature anything from a simple grill to a fully-equipped culinary haven, complete with a sink, refrigerator, and ample countertop space. Location, layout, and functionality are crucial elements of planning your outdoor kitchen, ensuring you can cook, dine, and enjoy your outdoor oasis with ease.
Before diving into the nitty-gritty details, it’s crucial to set realistic expectations and consider factors such as your budget, the size of your outdoor space, and the features you want to include in your kitchen.
In the following sections, we’ll elaborate on planning, materials, and construction tips, so you can be confident in every step of the process and create an outdoor kitchen that you’ll be proud to call your own.
Planning Your Outdoor Kitchen
So you’ve decided to take your outdoor living space to the next level with a brand new outdoor kitchen. Great choice! Let’s start by discussing some key factors to consider during the planning stage to make sure your outdoor kitchen becomes a functional and enjoyable addition to your home.
First things first, you’ll want to think about the location of your outdoor kitchen. Ideally, it should be close to your back door for easy access to the indoors. This not only makes it more convenient but also helps when transporting food, utensils, and dishes between your indoor and outdoor spaces. Consider spaces near a deck or patio, as these areas typically offer plenty of flat, open space.
Next up is deciding on the layout of your outdoor kitchen. Take some time to visualize how you want everything to be positioned, keeping in mind that functionality should be your top priority. The key is to create efficient work zones, like having your grill and food prep area near each other, and planning for ample countertop and storage space. Don’t forget to leave room for a small dining area, too!
While planning your layout, consider the size of your outdoor kitchen. How big or small do you want it to be, and can your chosen location accommodate it? It’s essential to have a clear picture of the scale before you start building to ensure your project goes smoothly from start to finish.
Now that you’ve got a solid plan in place, think about the materials you’ll use to construct your outdoor kitchen. Durability is key, as your kitchen will be exposed to the elements and should be able to withstand constant use. Some popular choices for outdoor kitchen construction include stainless steel, stone veneer, and weather-resistant plywood.
Incorporating lighting into your design is another vital aspect to consider. Adequate lighting ensures that you can enjoy your outdoor kitchen even after the sun goes down, and it can also add a touch of ambiance to your space.
Lastly, don’t forget about the appliances and amenities you want to include. The centerpiece of most outdoor kitchens is a high-quality grill, but why stop there? Consider adding a sink, drawers, and even a small refrigerator to make your outdoor cooking experience as seamless as possible.
With thoughtful planning that prioritizes functionality, a well-located outdoor kitchen, and the right materials in hand, your outdoor living space will be transformed into an inviting and enjoyable gathering place for you and your loved ones to enjoy for years to come.
Choosing the Perfect Location
When planning your outdoor kitchen, location is key. The perfect spot will depend on your personal preferences, available space, and landscaping. Let’s explore some factors to consider while deciding on the ideal location for your backyard kitchen.
One important aspect to consider is the proximity to your home. Positioning your outdoor kitchen near your patio or deck allows for easy access to your indoor kitchen, making it simpler to transport food, dishes, and utensils. Additionally, a close connection to your house’s utilities, such as gas and electricity, will make the installation process smoother.
Wind direction is another factor to keep in mind. You don’t want smoke from your grill blowing towards your dining or living areas, especially when you have guests over. Place your outdoor kitchen in a spot where the wind will carry the smoke away from these zones and create a comfortable atmosphere in your backyard.
Privacy is a crucial aspect of outdoor living spaces. Ideally, you want your outdoor kitchen to feel like a private retreat, shielded from neighbors’ prying eyes. Think about adding landscaping elements like tall plants or privacy screens that can help create a cozy, secluded atmosphere.
Don’t forget about the amount of sun exposure your outdoor kitchen will receive. A location with partial shade will protect you and your guests from direct sunlight, making for a more enjoyable cooking and dining experience. You can create shade by building your kitchen under a pergola, canopy, or a strategically placed tree.
Lastly, consider your existing landscaping and how it can complement your outdoor kitchen. Rather than seeing your backyard’s natural features as obstacles, use them to enhance the aesthetics of your new space. For example, if you have a beautiful garden or a serene water feature, incorporate views of these elements into your kitchen design.
By taking these factors into account, you can choose the perfect location for your outdoor kitchen and create a space that’s both functional and inviting.
Designing the Layout
When starting to plan your outdoor kitchen, it’s crucial to think about the layout, as it will be the foundation for your entire project. First, consider the space you have in your backyard and how much of that area you want to allocate to your kitchen. Ask yourself if the location is easily accessible and close to your back door or patio, making it convenient for you and your guests.
In your outdoor kitchen layout, envision where each appliance and piece of equipment will be. For example, plan where to put essential appliances, such as the grill, refrigerator, and sink. Try to create a functional arrangement that allows for an efficient flow of movement between different areas, such as the cooking zone, food prep areas, and dining area.
Next, think about the types of countertops and counters you will be using. Keep in mind that you need enough workspace for prepping and cooking. If possible, include an outdoor kitchen island, as it can serve multiple purposes such as additional workspace, storage, or even a seating area.
Don’t forget the importance of a dining area in your outdoor kitchen. Plan for enough space to accommodate a table and chairs or even a bar-style seating arrangement. This not only creates a cozy atmosphere but also allows your guests to enjoy their meals right there while watching the action unfold in the kitchen.
Here are some key factors to consider when designing the layout of your outdoor kitchen:
- Accessibility to the house and backyard
- Space allocation for appliances, workspace, and dining area
- Efficient flow of movement between areas
- The incorporation of an outdoor kitchen island if possible
Remember, a well-designed layout for your outdoor kitchen will not only make it functional and efficient but also enhance your overall outdoor living experience. Enjoy your new outdoor kitchen knowing you have designed a space that truly suits your needs.
Selecting Materials
When planning your outdoor kitchen, one of the most important decisions you’ll need to make is choosing the right materials. A well-thought-out combination of materials will not only be aesthetically pleasing but also functional and durable.
Wood has a warm and timeless appeal, making it a popular choice for outdoor kitchens. In fact, it’s versatile and can be used in various ways, such as for cabinetry or decorative accent pieces. However, you should opt for weather-resistant wood, like teak, cedar, or redwood, to ensure longevity.
Stone is another popular option, offering style and durability. Natural stone, like granite or marble, is an excellent choice for countertops due to its resistance to heat, stains, and scratches. You can also use stone veneer for a more lightweight and cost-effective alternative.
Metal is also a great choice, especially for appliances and fixtures in your outdoor kitchen. Stainless steel is a favorite because it’s easy to maintain and offers corrosion resistance.
Cement and concrete are versatile materials that can be used for a variety of applications in your outdoor kitchen, including countertops, flooring, and even structural elements. With proper sealing, these materials can be both durable and functional.
Brick, concrete block, and stone veneer are all excellent choices for the structural elements of your outdoor kitchen. They provide a sturdy foundation and can serve as decorative elements.
Tile is also a popular choice for outdoor kitchen countertops and flooring, as it’s both durable and attractive. Pick high-quality tiles that are suitable for outdoor use to ensure they can withstand the elements.
Stucco and cladding are other options to consider for the exterior finish of your outdoor kitchen. Stucco is easy to apply and provides a smooth, seamless finish, while cladding can add insulation and improve your kitchen’s overall performance.
Ultimately, your choice of materials will depend on your budget, environment, and personal style preferences. Mixing and matching is key here, so don’t be afraid to play around with different combinations to create a functional and beautiful outdoor kitchen that suits your lifestyle.
Building the Foundation and Frame
When you’re ready to create your dream outdoor kitchen, the first step is to build a solid foundation and frame. Here’s a quick guide on how to do that:
- Choose the location: Pick a spot close to your back door, ideally near a patio or deck. This allows you to easily access your outdoor kitchen and entertain guests.
- Creating the foundation: You’ll want to start by building a solid concrete slab as the foundation for your outdoor kitchen. This will support the weight of your structure and appliances. Excavate the area to a depth of about 6-8 inches, and make sure the ground is level. Then, create a wooden form to hold the cement mixture in place. Fill the form with the cement, making sure to evenly spread it using a notched trowel. Allow the concrete slab to cure for a few days before moving on to the next step.
- Building the frame: Now that you have a solid foundation, it’s time to create the frame for your outdoor kitchen. You can use either metal studs or wood for this task, but metal studs are typically more durable and resistant to the elements. To build the frame, start by marking the location of each stud on the concrete slab. With the studs, create a box-like structure, leaving spaces for doors, cabinets, and appliances.
- Adding walls and cabinets: Once the frame is in place, you can begin to install the walls and cabinets. Start by cutting plywood sheets to the appropriate size and attaching them to the metal studs with screws. This will form the base of your cabinets and provide additional support to your outdoor kitchen.
- Securing your frame to the foundation: To prevent your outdoor kitchen from shifting or collapsing, it’s essential to secure the frame to the foundation. Create anchor points by drilling holes into the slab and frame. Then, insert bolts and attach washers before tightening them with a wrench.
- Applying mortar: Finally, apply a layer of mortar to the plywood walls using a notched trowel. This will help attach the stone veneer or other finishing materials you choose for your outdoor kitchen.
Congratulations, your outdoor kitchen foundation and frame are now ready for the next steps, from adding appliances, countertops, and other finishing touches. Make sure you follow the instructions carefully and always prioritize safety during the construction process. Good luck!
Constructing the Countertop
When building your outdoor kitchen, choosing the right materials for your countertop is essential. Let’s look at some popular options to help you make the best decision.
One popular choice for outdoor kitchen countertops is tile. Tile countertops offer a variety of design options, as well as durability and easy maintenance. Keep in mind that you’ll want to choose a tile that can withstand outdoor elements. Porcelain and natural stone tiles, such as granite and slate, are excellent choices for outdoor kitchens.
If you prefer a solid surface, concrete countertops make a great choice for outdoor kitchens. Concrete countertops are highly durable, heat resistant, and can be customized in terms of color, texture, and shape. You can either choose to have a professional build and install your concrete countertop, or take the DIY route by mixing, molding, and polishing the cement yourself.
Stone countertops are another beautiful and functional option for outdoor kitchens. Materials like granite, marble, and quartz offer unmatched durability and a natural, elegant look. Stone countertops can be expensive, but the investment is often worth it due to their long-lasting qualities.
For those preferring a rustic touch, wood countertops can provide a warm and inviting look to your outdoor kitchen. While not as durable as stone or concrete options, wood countertops can still hold up well when properly sealed and maintained. Make sure to choose moisture-resistant wood, such as cedar or teak, for the best results.
No matter which material you select for your outdoor kitchen countertop, it’s important to prioritize both functionality and aesthetics. Don’t forget about maintenance requirements as well; the easier it is to care for your countertop, the more enjoyable your outdoor kitchen experience will be. Happy cooking!
Installing Cabinets and Storage
When it comes to installing cabinets and storage for your outdoor kitchen, the options are nearly endless. Pick from various stylish and functional doors, drawers, and boxes to make the most out of your available space.
Start by selecting the right cabinets for your needs. Consider the size, material, and finish that will work best for your outdoor space. Weather-resistant materials like stainless steel, marine-grade polymer, and teak are excellent choices for outdoor kitchens.
Once you have a clear vision of the cabinets you want, plan their layout. Keep in mind the appliances you’ll need to store and the countertop space you’ll require. Optimal placement of cabinets will ensure a smooth workflow as you prepare, cook, and serve meals.
Now you’re ready to install the cabinets. Assemble the boxes and attach them securely to a sturdy frame. Double-check that the cabinets are level and securely fixed to the frame. If your cabinets have adjustable shelves, set them at desired heights to accommodate various items.
Install doors on your cabinets to protect your belongings from the elements and keep your outdoor kitchen looking neat. Make sure the doors are aligned and swing open smoothly. Add weatherstripping to the seals for added protection against moisture and debris.
Don’t forget the drawers! They offer practical and easily accessible storage for utensils, cookware, and other essentials. Consider using full-extension drawer slides for better access and usability. Clear liners on the bottom of drawers will help keep them clean and protect their surfaces.
Setting Up the Grill and Appliances
So, you’re ready to set up the grill and appliances in your outdoor kitchen? Great! Let’s start by choosing the perfect grill for your cooking space. You have several options, including gas grills, propane grills, and even meat smokers. Remember, the type of grill you pick will directly impact the overall design and function of your outdoor cooking area.
Once you’ve decided on a grill, it’s time to think about adding other appliances. A refrigerator is always a good choice to keep drinks and food nice and cold, even on the hottest day. A dishwasher can make cleaning up after your outdoor feast a breeze. If you’re a pizza lover, consider adding a pizza oven for that authentic wood-fired flavor. And if you want to create a cozy ambiance, a fireplace might just be the perfect addition.
Now, keep in mind the layout of your outdoor kitchen. Make sure you have enough space for all of your appliances, and they’re set up in functional zones for ease of use. Here are a few things to consider:
- Grill placement: Position the grill at least 10 feet away from combustible materials and build in storage for a fire extinguisher.
- Gas grill safety: Double-check hose connections to prevent any gas leaks, and keep a water-soap solution on hand for regular checks.
- Refrigeration: Ensure you have adequate power supply for a fridge and think about placement to keep it out of direct sunlight.
- Ventilation: If your outdoor kitchen is covered, factor in proper ventilation to keep smoke and heat at bay.
Finally, don’t forget about those little details, like shelves for storing dishes and glasses, garbage solutions, and even an ice maker for those hot summer days. With careful planning and attention to detail, you’ll soon be enjoying delicious meals in your brand new outdoor kitchen!
Installing an Outdoor Sink
An outdoor sink can make a huge difference in your outdoor kitchen. It adds functionality and convenience to your cooking and entertaining experience. In this section, we will cover the steps to install an outdoor sink without any sub-sections, keeping it brief and engaging.
First, you need to decide on the location for your outdoor sink. Ensure that it is close to your cooking area for easy access and has a suitable water supply and drainage system nearby. Measure the space to determine the appropriate size for your sink and gather the necessary plumbing materials.
Once you’ve picked the perfect spot, it’s time to install the plumbing. Start by digging a trench from your water supply line to the sink location. Lay your water supply pipes in the trench, making sure to include a shut-off valve near the house for easy access. Remember that you can run two water supply pipes for hot and cold water, or opt for an on-demand water heater installed on the sink cabinet to save water.
Next, connect your sink drain to a suitable drainage system. If needed, create a simple dry well to help with drainage. This involves digging a hole, filling it with gravel, and adding a perforated drainpipe. Ensure that your dry well is located far enough from any nearby structures to avoid water damage from the runoff.
With your plumbing in place, you can now install your outdoor sink. Use a trowel to apply mortar evenly on the countertop where the sink will be placed. Carefully set the sink into the mortar, taking care to keep it level and aligned with your plumbing connections. Connect the sink to your water supply and drain lines, then turn on the water and test for any leaks.
Finally, finish your outdoor sink installation by applying waterproof sealant around the sink edges and all plumbing connections. This will help prevent water damage and ensure your sink remains in place for years to come.
Now, with your outdoor sink installed, you can enjoy enhanced functionality and convenience in your outdoor kitchen. Happy cooking!
Adding Lighting and Safety Features
Designing an outdoor kitchen is an exciting project, and adding the appropriate lighting and safety features will ensure that your space is both functional and enjoyable.
When it comes to lighting, there’s a variety of options to consider. First, you’ll want to include task lighting for cooking and food preparation. This can involve overhead lights for your grill and other appliances. It’s also a good idea to install wall lights that shine down onto your countertops to ensure you can see the food being served. Don’t forget about lighting for your dining and bar area, as well as pathway lights and stair/step lights if you have a satellite kitchen with multiple sections.
Safety is another crucial aspect of designing your outdoor kitchen. To ensure your gas shut-off valve is accessible and functional, locate it in a convenient spot. This is vital in case a gas leak occurs, as a quick shut-off can prevent dangerous situations.
Here are a few more key safety features to consider for your outdoor kitchen:
- Accessible gas shut-off: This is crucial for quick response in case of a gas leak or other emergencies.
- Non-slip flooring: Choose materials that provide traction, especially when wet, to reduce the risk of accidents.
- Fire extinguisher: Keep a fire extinguisher nearby, and make sure it’s easy to access. Know how to use it in case of an emergency.
- Outlet covers: Use weatherproof covers for your electrical outlets, especially those located near water sources like sinks or beverage stations.
- Safety barriers: If you have a pool or other hazard nearby, consider installing barriers or fences to keep children safe.
- Proper ventilation: Ensure you have adequate ventilation to prevent the buildup of smoke and carbon monoxide from your grilling area.
By incorporating these lighting and safety features, you will create a comfortable, well-lit, and secure space for you and your guests to enjoy. Remember, a successful outdoor kitchen design blends aesthetics with function and safety.
Finishing Touches
After you’ve built the main structure of your DIY outdoor kitchen, it’s time to add those finishing touches that will make your space inviting and functional. From installing a barbecue and pizza oven to creating a comfortable seating area, these tips will help you get the most out of your outdoor kitchen.
When it comes to cooking appliances, there’s no shortage of options for your outdoor kitchen. A classic choice is a barbecue, which can range from a simple propane grill to a high-end, built-in setup. If you’re a pizza lover, consider adding an outdoor pizza oven. A wood-fired pizza oven can be a show-stopping centerpiece and provide an authentic, delicious result. Alternatively, you could opt for a more affordable propane pizza oven that still delivers excellent results.
If your DIY outdoor kitchen kit includes a sink or refrigerator, you’ll need to ensure the plumbing and electrical connections are installed properly. To avoid any mishaps, it’s best to work with a licensed contractor for these installations.
To make your outdoor kitchen even more functional, add storage and workspace in the form of cabinets and countertops. Consider using materials like stone or tile for the countertops, as they’ll withstand the outdoor elements better than wood. For cabinets, opt for weather-resistant options such as stainless steel or marine-grade polymer to keep your items safe and dry.
Don’t forget to consider the comfort and appearance of your outdoor kitchen. Adding a gazebo or pergola can provide much-needed shade and protection from the elements, making your space more enjoyable and usable throughout the year. Outdoor furniture, like a comfortable seating area, is essential for spending time with friends and family while enjoying your newly created space.
For a polished appearance, apply a scratch coat of adhesive to the walls of your outdoor kitchen. This will help protect the structure from the elements and provide a smooth surface for any paint, stucco, or tile finish you decide to apply.
Can I Incorporate an Outdoor Kitchen into My Backyard Oasis Design?
Yes, you can absolutely incorporate an outdoor kitchen into your backyard oasis design, transforming outdoor spaces effortlessly. Adding a fully equipped kitchen to your outdoor living area can create a seamless transition between indoor and outdoor entertaining, making your backyard the perfect place to host gatherings and enjoy meals alfresco.
Maintaining Your Outdoor Kitchen
Taking care of your outdoor kitchen is essential to keeping it in tip-top shape and ready for all your entertaining needs. Let’s dive into a few key aspects of outdoor kitchen maintenance, including cleaning, protection, and weatherproofing.
Cleaning
To keep your outdoor kitchen looking its best, regular cleaning is necessary. Here are some cleaning tips to keep in mind:
- Wipe down countertops and surfaces with a mild soapy solution and a soft cloth.
- Clean your grill grates with a grill brush after each use, and deep clean the grill at least once a season.
- Empty any grease traps or drip pans regularly to prevent buildup and potential fire hazards.
- For stainless steel appliances, use a specialized stainless steel cleaner to remove dirt and fingerprints and maintain their shine.
- Don’t forget to clean your outdoor fridge, sink, and any other appliances or fixtures.
Protection
Protecting your outdoor kitchen from the elements is crucial for its longevity. Consider these protection tips:
- Invest in weather-resistant covers for your grill and other appliances to shield them from rain, snow, and debris.
- Ensure your countertops are sealed properly to prevent staining and damage from moisture and spills.
- Seal any wooden components, like pergolas or cabinets, with a weather-resistant sealant to prevent rot and damage from insects.
Weatherproofing
To ensure your outdoor kitchen can withstand various weather conditions, implement these weatherproofing measures:
- Choose weather-resistant materials for your countertops, such as granite, concrete, or tile.
- Opt for outdoor-rated appliances specifically designed to handle the outdoor environment.
- If your outdoor kitchen is in an open area, consider adding a pergola or shade sail to provide protection from sunlight and rain.
- Install outdoor lighting to make your kitchen functional in the evenings and during overcast days.
By following these maintenance tips, you’ll keep your outdoor kitchen looking great and ready for your next backyard party. Remember, a little effort goes a long way in preserving the life and functionality of your outdoor cooking space.
