Are you dreaming of having a beautiful inground pool in your backyard? Installing an inground pool is an exciting project that can provide years of enjoyment for you and your family.
However, it’s important to understand that the process involves several key steps to ensure a successful installation.
In this article, we will walk you through the nine key steps involved in installing an inground pool, from planning and designing to adding the finishing touches.
The first step in installing an inground pool is planning and designing. This involves determining the size, shape, and location of your pool, as well as selecting any additional features such as waterfalls or spa jets.
Once the design is finalized, you will need to obtain the necessary permits and approvals from your local authorities. Excavation and site preparation comes next, where the area for the pool is excavated and prepared for installation.
From there, the pool shell is installed, followed by the plumbing and electrical work. Equipment installation, such as pumps and filters, is then completed, and the pool is filled with water.
Finally, finishing touches such as decking, landscaping, and safety measures are added to complete your dream inground pool.
So, let’s dive into the nine key steps involved in installing an inground pool and get closer to making your backyard oasis a reality.
Planning and Designing Your Inground Pool
Now that you’ve decided to take the plunge and add an inground pool to your backyard oasis, it is time to roll up your sleeves and start planning and designing your dream aquatic escape. This first step is crucial as it sets the foundation for the entire installation process.
Start by determining the ideal location for your pool. Consider factors such as sunlight exposure, existing landscaping, and proximity to the house. You want to ensure that your pool is easily accessible and blends seamlessly with the overall aesthetics of your backyard.
Next, you need to decide on the size and shape of your inground pool. Think about how you plan to use the pool – will it be primarily for swimming laps, entertaining friends and family, or simply as a relaxing retreat?This will help you determine the dimensions and layout that best suit your needs. Additionally, consider adding features such as waterfalls, slides, or a spa area to enhance the overall experience.
Once you have a clear vision of your pool’s location, size, and design, it is time to create a detailed plan. This involves working with a professional pool designer or contractor who can help turn your ideas into a reality.
They will take into account factors such as local building codes, soil conditions, and plumbing requirements to create a comprehensive plan. This plan will serve as a blueprint for the installation process and will ensure that everything is executed smoothly and efficiently.
Remember, careful planning and design are essential to creating a stunning inground pool that you can enjoy for years to come.
Obtaining Permits and Approvals
Before diving into the process of putting in an inground pool, it is important to secure the necessary permits and approvals. This step is crucial as it ensures that your pool installation complies with local regulations and safety standards.
Obtaining permits and approvals typically involves submitting detailed plans and specifications to the appropriate local authorities, such as the building department or the zoning board.
These plans may include information on the pool’s location, dimensions, fencing requirements, and drainage systems.
It is essential to carefully follow the guidelines provided by the local authorities to avoid any potential delays or complications during the installation process.
In addition to obtaining permits and approvals, it is also important to consider any potential neighborhood or homeowner association requirements. Some neighborhoods or associations may have specific guidelines or restrictions regarding pool installations.
It is crucial to review these requirements and ensure compliance before proceeding with the installation. Failure to do so may result in costly fines or even the removal of the pool. It is also advisable to communicate with your neighbors and inform them of your plans to install a pool.
This can help maintain good relations and address any concerns they may have about noise, privacy, or property boundaries.
Overall, obtaining permits and approvals is a crucial step in the installation process that ensures your inground pool is compliant with local regulations and meets all safety standards.
Excavation and Site Preparation
One important aspect to consider when planning for an inground pool is the excavation and site preparation, which includes clearing the area and ensuring proper drainage.
Before any digging can begin, the area where the pool will be installed needs to be cleared of any vegetation, rocks, or other obstructions. This involves removing any trees, shrubs, or grass that may be in the way.
Additionally, any underground utilities such as gas lines, water pipes, or electrical cables need to be located and marked to avoid any potential damage during the excavation process. Once the area is cleared, the next step is to ensure proper drainage.
This involves assessing the natural slope of the land and making any necessary adjustments to ensure that water does not collect in the pool area.
Proper drainage is essential to prevent any water damage or flooding issues that could occur in the future.
After the area has been cleared and the drainage has been addressed, the next step in the excavation and site preparation process is to actually dig the hole for the pool.
This is typically done using heavy machinery such as excavators or backhoes. The size and shape of the hole will depend on the specific design of the pool and any additional features such as diving boards or stairs.
It is important to follow the manufacturer’s guidelines and any local building codes when determining the dimensions of the hole. Once the hole has been dug, it is important to inspect the ground for any soft spots or unstable soil that may need to be addressed before proceeding with the installation.
This may involve adding additional fill or compacting the soil to ensure a stable foundation for the pool.
Overall, proper excavation and site preparation are crucial steps in the installation of an inground pool to ensure a solid and stable foundation for years of enjoyment.
Installing the Pool Shell
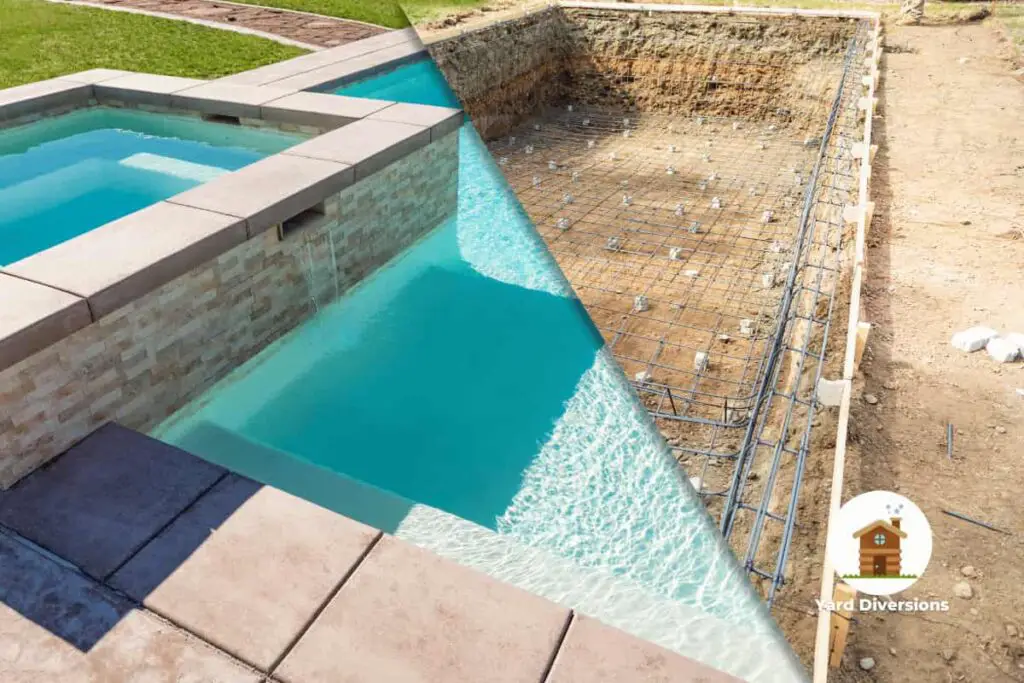
The excitement builds as the pool shell is carefully placed into the hole, bringing the dream of a backyard oasis one step closer to reality.
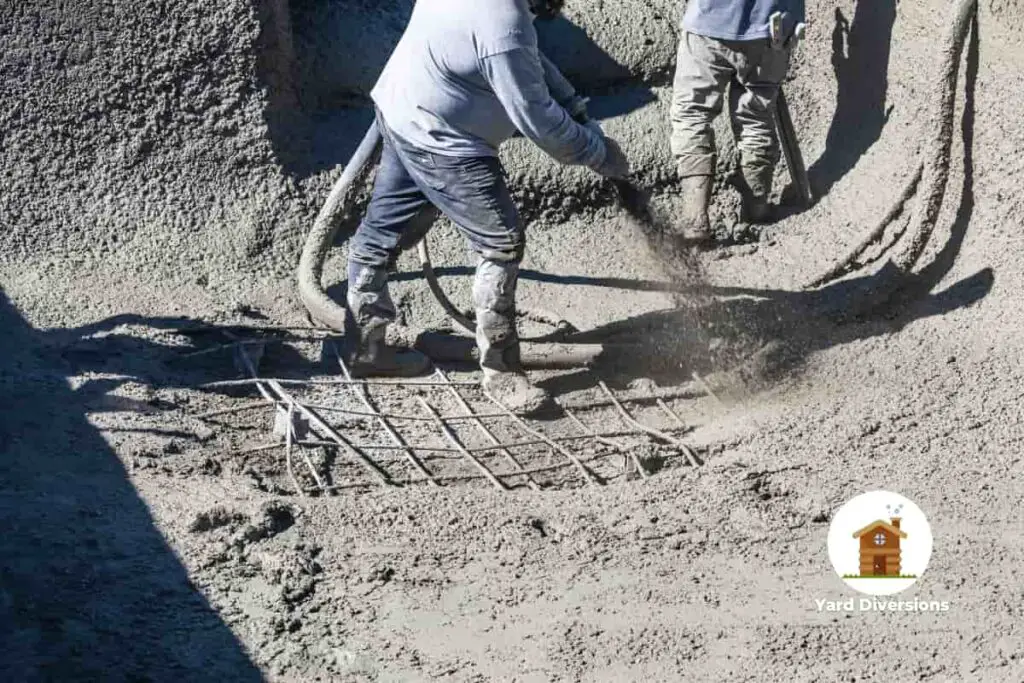
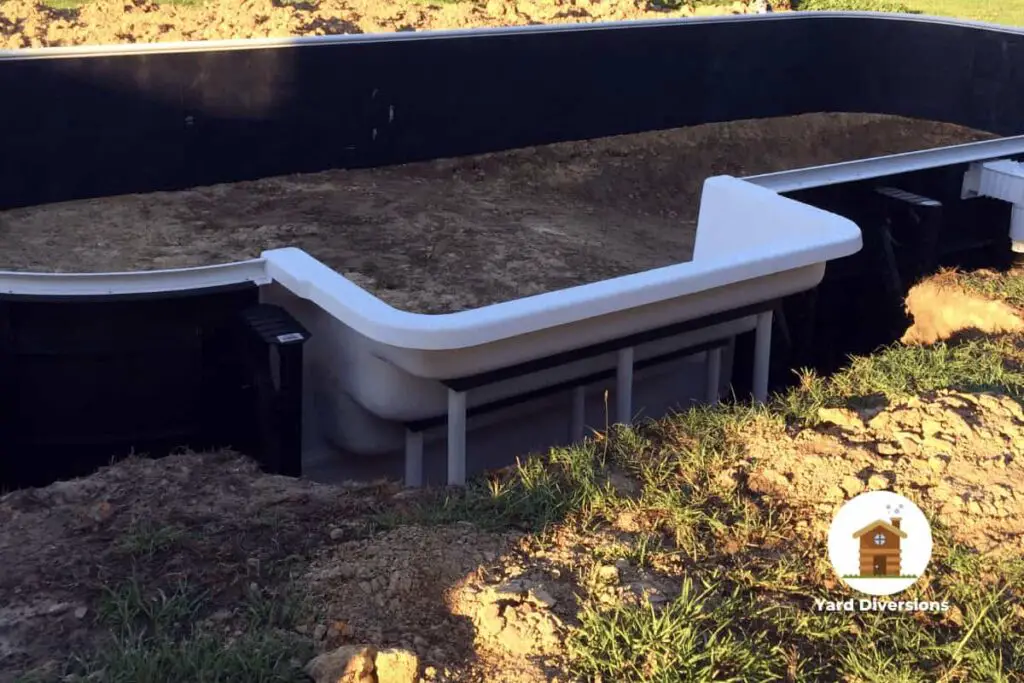
Before the installation, the site needs to be prepared by ensuring that the hole is properly excavated and leveled. Once this is done, the pool shell, which is typically made of fiberglass, concrete, or vinyl, is lowered into the hole using heavy machinery.
The installation process requires precision and attention to detail to ensure that the pool shell is properly aligned and level. This is crucial for the structural integrity of the pool and to avoid any future issues.
Once the pool shell is in place, the next step is to connect the necessary plumbing and electrical components. This includes installing the skimmer, main drains, return lines, and any other necessary fittings.
The plumbing and electrical work should be done by professionals to ensure that everything is installed correctly and meets safety standards. After the plumbing and electrical connections are completed, the pool shell is backfilled with a combination of sand and gravel.
This helps to provide stability and support to the pool shell. Finally, the pool deck is installed around the perimeter of the pool, completing the installation process. The pool deck not only adds aesthetic appeal but also provides a safe and convenient area for poolside activities.
Overall, installing the pool shell is a crucial step in the process of installing an inground pool. It requires careful planning, proper excavation, precise placement, and professional plumbing and electrical work.
By following these key steps, homeowners can ensure that their inground pool is installed correctly and will provide years of enjoyment and relaxation.
Plumbing and Electrical Work
To ensure the proper functioning and safety of your pool, you’ll need to hire professionals to handle the intricate plumbing and electrical work involved in connecting the necessary components.
Plumbing is a crucial aspect of pool installation as it involves the installation of pipes, valves, and filters that allow water to circulate properly. Professionals will carefully plan the layout of the plumbing system, ensuring that it is efficient and meets all safety standards.
They will then install the pipes, connecting them to the pool’s main drain, skimmer, and return fittings. Additionally, professionals will install the necessary valves to control the flow of water and ensure proper filtration.
Electrical work is another important step in installing an inground pool. Professionals will handle the installation of electrical systems, including the wiring and connections for pool lights, pumps, and heaters.
They will ensure that all electrical components are properly grounded and meet all safety regulations. This is crucial to prevent any electrical hazards and ensure the longevity of your pool equipment.
Professionals will also install the necessary circuit breakers and safety devices to protect against electrical overloads or short circuits.
By hiring professionals to handle the plumbing and electrical work, you can rest assured that your pool will be installed correctly and will operate safely and efficiently for years to come.
Equipment Installation
Don’t underestimate the excitement of seeing your pool come to life as the equipment is being installed.
This is a crucial step in the inground pool installation process, as it involves setting up all the necessary equipment to ensure your pool functions properly.
The equipment installation typically includes the placement of the pool pump, filter, heater, and any additional features such as a saltwater system or automatic pool cleaner.
Each piece of equipment needs to be carefully connected and positioned to ensure optimal performance and functionality of your pool.
The first step in equipment installation is to position the pool pump and filter. These components are essential for keeping your pool water clean and clear. The pump circulates the water through the filter, removing dirt, debris, and other impurities.
It is important to place the pump and filter in a location that is easily accessible for maintenance and repairs. Next, the heater, if included, is installed. The heater allows you to control the temperature of your pool, ensuring comfortable swimming conditions year-round.
Finally, any additional features or accessories, such as a saltwater system or automatic pool cleaner, are installed according to the manufacturer’s instructions. These features can enhance the overall pool experience and make maintenance easier.
Once all the equipment is installed, it is important to test and ensure that everything is functioning properly before moving on to the next step in the installation process.
Filling the Pool with Water
Get ready to experience the exhilaration of filling your pool with water and watching it transform into a sparkling oasis right in your own backyard.
The process of filling an inground pool with water is a crucial step in the installation process. Before you begin, ensure that all the necessary equipment, such as hoses and a water source, are readily available.
To start, connect one end of a hose to a water source, such as a faucet, and the other end to the pool’s water intake valve. Slowly turn on the water and let it flow into the pool. It is important to avoid filling the pool too quickly, as this can cause the water to become turbulent and disturb the pool’s structure.
Monitor the water level closely and adjust the flow accordingly. As the water level rises, make sure to regularly check for any leaks or issues with the pool’s plumbing system. Once the pool is filled to the desired level, turn off the water and disconnect the hose. Congratulations, your pool is now ready to be enjoyed!
Filling an inground pool with water is a process that requires patience and attention to detail. It is important to follow the manufacturer’s instructions and guidelines for your specific pool model.
Additionally, consider using a pool water testing kit to ensure that the water is properly balanced and safe for swimming. Proper water chemistry is crucial for maintaining the pool’s cleanliness and longevity.
Regular maintenance and monitoring of the water quality will help keep your pool looking and feeling its best. So sit back, relax, and enjoy the fruits of your labor as you dive into your very own backyard oasis.
Adding Finishing Touches
After filling the pool with water, the next step in installing an inground pool involves adding the finishing touches. This is the exciting part where the pool starts to come together and look complete.
The finishing touches can include various elements such as pool coping, decking, landscaping, and any additional features or accessories.
One important aspect of adding the finishing touches is installing the pool coping. Pool coping is the material that is placed around the edge of the pool to provide a smooth and finished appearance.
It also serves as a protective barrier between the pool structure and the surrounding area. There are various options for pool coping materials, such as natural stone, concrete, or even tile. The choice of coping material depends on personal preference and the overall design aesthetic of the pool.
In addition to pool coping, decking is another important element in completing the look of an inground pool. The pool deck is the area surrounding the pool that provides space for lounging, sunbathing, and entertaining.
It is essential to choose a deck material that is not only visually appealing but also durable and slip-resistant. Common options for pool decks include concrete, pavers, and natural stone. The deck can be customized with different colors, patterns, and textures to complement the overall design of the pool area.
Once the pool coping and decking are in place, it’s time to consider the landscaping around the pool. Landscaping adds the final touch of beauty and enhances the overall ambiance of the pool area.
This can include planting trees, shrubs, and flowers, or creating a lush green lawn. Landscaping also helps to create a sense of privacy and can be used to hide any pool equipment or utilities.
Additionally, adding lighting fixtures can create a stunning nighttime atmosphere and allow for safe swimming even after dark.
Adding any additional features or accessories can be the cherry on top of the inground pool installation. This can include water features like fountains or waterfalls, pool heaters, automatic pool covers, or even an outdoor shower area. These extra touches can enhance the functionality and enjoyment of the pool, making it a true oasis for relaxation and entertainment.
In summary, adding the finishing touches is an important step in installing an inground pool. It involves installing pool coping, selecting suitable deck material, landscaping the surrounding area, and considering any additional features or accessories.
These elements come together to create a beautiful and functional pool that can be enjoyed for years to come.
Decking, Landscaping, and Safety Measures
To create a stunning outdoor oasis, imagine yourself lounging on a slip-resistant deck, surrounded by lush landscaping that provides both privacy and beauty.
Decking is an essential part of any inground pool installation, as it not only enhances the aesthetic appeal but also provides a safe and functional space for relaxation and entertainment.
When choosing the right decking material, it is important to consider factors such as durability, maintenance requirements, and aesthetic compatibility with the surrounding landscape. Common options include wood, composite, and concrete.
Wood decking offers a natural and warm look but requires regular sealing and maintenance. Composite decking, on the other hand, is low-maintenance and resistant to rot, fading, and warping.
Concrete decking is durable and can be customized with various finishes, but it may become slippery when wet. Regardless of the material chosen, it is crucial to ensure that the deck is slip-resistant to prevent accidents and injuries.
In addition to decking, landscaping plays a vital role in creating a visually appealing inground pool area. Well-thought-out landscaping can provide both privacy and beauty, making your pool area feel like a private retreat.
Consider planting trees, shrubs, and flowers strategically to create a natural screen and block the view from neighboring properties. Choose plants that are suitable for your climate and that require minimal maintenance.
Incorporating elements such as rock features, waterfalls, or decorative statues can add interest and enhance the overall ambiance of the pool area. It is also important to consider safety measures when designing your pool area.
Install proper fencing and gates to prevent unauthorized access and ensure the safety of children and pets. Non-slip surfaces around the pool and adequate lighting are also important for preventing accidents, especially during nighttime pool use.
By carefully planning and incorporating decking, landscaping, and safety measures, you can create an inground pool area that is both aesthetically pleasing and functional.
Are the Steps to Install an Above Ground Pool Similar to Installing an Inground Pool?
The above ground pool installation steps differ from those of an inground pool. While both involve planning and site preparation, an inground pool requires excavation and concrete work. In contrast, above ground pools require leveling the ground, assembling and installing the pool walls, liner, and equipment. The process for each type of pool varies significantly to suit their respective designs and installation requirements.
Frequently Asked Questions
What are the maintenance requirements for an inground pool?
The maintenance requirements for an inground pool include regular cleaning, checking and adjusting the water pH levels, maintaining proper filtration and circulation, and ensuring the pool equipment is functioning properly.
Can I install an inground pool in a sloped backyard?
Yes, it is possible to install an inground pool in a sloped backyard. However, it may require additional planning and engineering to ensure proper drainage and stability of the pool.
How long does it typically take to install an inground pool?
The typical time it takes to install an inground pool varies depending on factors such as the size, complexity, and site conditions, but it can generally range from a few weeks to a few months.
Are there any safety regulations or guidelines that I need to follow when installing an inground pool?
Yes, there are safety regulations and guidelines that need to be followed when installing an inground pool. These regulations ensure the safety of users and include requirements for fencing, electrical systems, and proper drainage to prevent accidents and injuries.
Can I install an inground pool myself or do I need to hire a professional?
It is recommended to hire a professional for installing an inground pool. They have the expertise and knowledge to ensure that the pool is installed correctly, following safety regulations and guidelines.
Can the Steps for Pool Renovation also be Applied to Installing a New Inground Pool?
When considering pool renovation or installing a new inground pool, there may be similarities in the steps involved. However, one crucial difference would be the need to replace inground pool steps during renovation, which may not necessarily apply to the installation of a new pool.
Conclusion
In conclusion, installing an inground pool involves a series of key steps that require careful planning, design, and execution.
From obtaining permits and approvals to excavating the site and installing the pool shell, each stage of the process is essential for creating a functional and beautiful pool.
Plumbing and electrical work, equipment installation, and filling the pool with water are also crucial steps in ensuring that the pool is safe and ready for use.
Once the pool is installed, adding finishing touches such as decking, landscaping, and safety measures can enhance the overall aesthetic appeal and functionality of the pool area. It is important to consider these aspects as they not only contribute to the overall enjoyment of the pool but also ensure the safety of anyone using it.
By following these key steps and paying attention to detail, homeowners can create a stunning inground pool that will provide years of enjoyment and relaxation for themselves and their families.
