Staining your concrete patio can transform a dull outdoor space into a vibrant area, and doing it like a pro starts with thorough preparation. You’ll begin by gathering essential materials and ensuring the concrete is clean and free from debris. After cleaning, repairing any cracks or damage is vital. But how do you know if your surface is ready for staining?
Testing for absorption is an important step. Once you’ve checked these off your list, choosing the right stain and applying it with precision will make all the difference. Ready to uncover the secrets to achieving that perfect finish?
Key Takeaways
- Prepare the Surface: Remove debris, clean thoroughly, and ensure the concrete is free of existing paint or sealer.
- Repair and Test: Inspect and repair cracks, and test surface absorption to ensure proper stain adherence.
- Choose the Right Stain: Select a stain type and color that suits your design preferences and expertise level.
- Apply the Stain: Use a sprayer, brush, or roller to apply the stain evenly, experimenting with blending and layering techniques for desired effects.
- Seal the Surface: Apply a suitable sealer to protect the stained concrete and enhance its longevity, allowing adequate drying time.
Gather Your Materials
To get started on staining your concrete patio, you’ll need to gather materials like concrete stain, sealer, a sprayer, brush, roller, and protective gear. These items are essential for achieving a professional finish. First, make sure you have enough concrete stain. On average, a gallon covers 200-400 square feet, so calculate accordingly based on your patio’s size.
You’ll also need a pump-up sprayer for applying the stain evenly across the concrete. It’s a good idea to have a separate sprayer ready for the sealer application to avoid mixing materials. Using a brush and roller will help you get into tight corners and make sure the stain is applied uniformly.
Protective gear is important when working with chemicals like concrete stain and sealer. Wear gloves, safety goggles, and old clothing to protect your skin and eyes. Additionally, consider using spiked shoes to avoid leaving footprints on the freshly stained surface.
Once you’ve gathered all these materials, you’re well-prepared for the staining process. This preparation will ensure a smooth and efficient workflow, helping you achieve the best results for your concrete patio.
Clean the Concrete
Thoroughly cleaning the concrete is crucial for achieving a lasting and even stain on your patio. Start by removing any furniture, plants, and other objects from the area. Cover surrounding areas with plastic or paper to protect them from over-spray during the staining process.
To clean the concrete surface thoroughly, follow these steps:
- Remove debris: Sweep the patio to eliminate loose dirt and debris. This step guarantees the surface is clear before deeper cleaning.
- Apply cleaner: Use ProClean Degreaser™ to break down any oil or grease stains. Pour the degreaser onto the surface and let it sit for 10-15 minutes.
- Scrub the surface: Take a stiff scrub brush and vigorously scrub the entire patio to remove stains and grime. Rinse the area with water and let it dry completely.
If your concrete patio has existing paint or sealer, make sure to remove it before applying the new stain. Test the surface absorption by sprinkling water on it; if it beads up, you may need to etch the surface for proper stain adhesion. Also, remember that newly poured concrete must cure for at least 30 days before staining to avoid potential issues.
Repair Cracks and Damage
Repairing cracks and damage in your concrete patio is important for achieving a smooth, uniform finish when you stain. Start by inspecting the surface for any concrete cracks or chips. Use a concrete crack filler to fill in cracks, making sure to follow the manufacturer’s instructions. Once applied, allow the crack sealant to dry for at least 24 hours.
For chipped edges or other minor damages, apply a vinyl patching compound. This compound is ideal for surface preparation, making sure those small imperfections don’t affect your final stain. After applying, smooth out uneven patches using a floor scrubber or a similar tool. This step is essential for creating a seamless surface.
If you encounter larger patches that need repair, use an appropriate patching material and allow it to dry completely. Depending on the product, this can take anywhere from 1 to 4 weeks. Patience here is crucial; rushing can compromise your staining results.
Once all repairs are complete and everything is dry, your concrete patio will be ready for the next steps in the staining process. Proper surface preparation ensures a professional, long-lasting finish.
Test Surface Absorption
Regularly check the surface absorption by sprinkling water on the concrete to see if it absorbs quickly, indicating it’s ready for staining. This simple test helps you understand if the concrete is prepared for the staining process. If the water absorbs quickly, you’re likely good to go. However, if the water beads up or takes too long to absorb, you’ll need to take further steps.
Use a Concrete Moisture Meter: Before applying the stain, use a concrete moisture meter to check the moisture levels. This tool ensures that the surface is dry enough for the stain to adhere properly, preventing any issues in the future.
Apply an Etching Solution: If the surface fails the water absorption test, apply a concrete etching solution. This solution helps open up the pores of the concrete, allowing for better stain penetration and a more lasting finish.
Retest Surface Absorption: After using the etching solution, retest the surface absorption by sprinkling water again. This step confirms that the concrete is now adequately prepared for staining.
Testing surface absorption is essential to make sure the stain will penetrate evenly and provide a durable, lasting finish. Properly prepared concrete is key to a successful staining process.
Choose Your Stain
Once you’ve confirmed that the concrete is ready for staining, it’s time to choose the type of stain best suited for your patio’s look and feel. You’ll find two primary concrete stain options: water-based stains and acid stains. Your choice will depend on the desired color, finish, and your level of expertise.
Water-based stains are a great option if you’re looking for a wider range of colors. They’re easier to apply, making them ideal for beginners. These stains sit on the concrete’s surface, providing a vibrant and consistent color. If your desired color is specific, water-based stains might be your best bet.
On the other hand, acid stains create a chemical reaction with the concrete, resulting in a unique and durable finish. This type of stain penetrates the concrete, creating natural-looking color variations. It’s perfect if you want a more earthy or antiqued look. However, applying acid stains requires a bit more skill, so consider your level of expertise before choosing this option.
Ultimately, the choice of stain will greatly impact the final look of your concrete patio. Carefully consider your concrete stain options to make sure you achieve the desired color and finish.
Choose your stain wisely to create the perfect patio ambiance.
Apply the Stain
To start applying the stain, make certain the concrete surface is clean and dry to achieve the best results. The surface temperature should be between 40°F and 95°F. Shake the stain thoroughly before pouring it into the sprayer to guarantee even distribution. When applying the stain, use circular motions with random overlaps for even coverage on the porous concrete.
Here are the steps to apply the stain effectively:
- Preparation:
- Wear spiked shoes to avoid leaving shoe prints.
- Follow proper ventilation guidelines and avoid open flames.
- Application:
- Spray the stain in even passes using circular motions.
- Ensure the concrete surface is fully covered.
- Reapplication:
- Allow the first coat to dry.
- If necessary, apply a second coat to achieve the desired depth of color.
As you apply the stain, keep in mind that it will undergo a chemical reaction with the concrete surface, which will determine the final color. Be patient and make sure to maintain even coverage throughout the process.
If the first coat doesn’t meet your expectations, you can always apply a second coat for a richer finish. Remember, even passes and thorough coverage are key for a professional-looking patio.
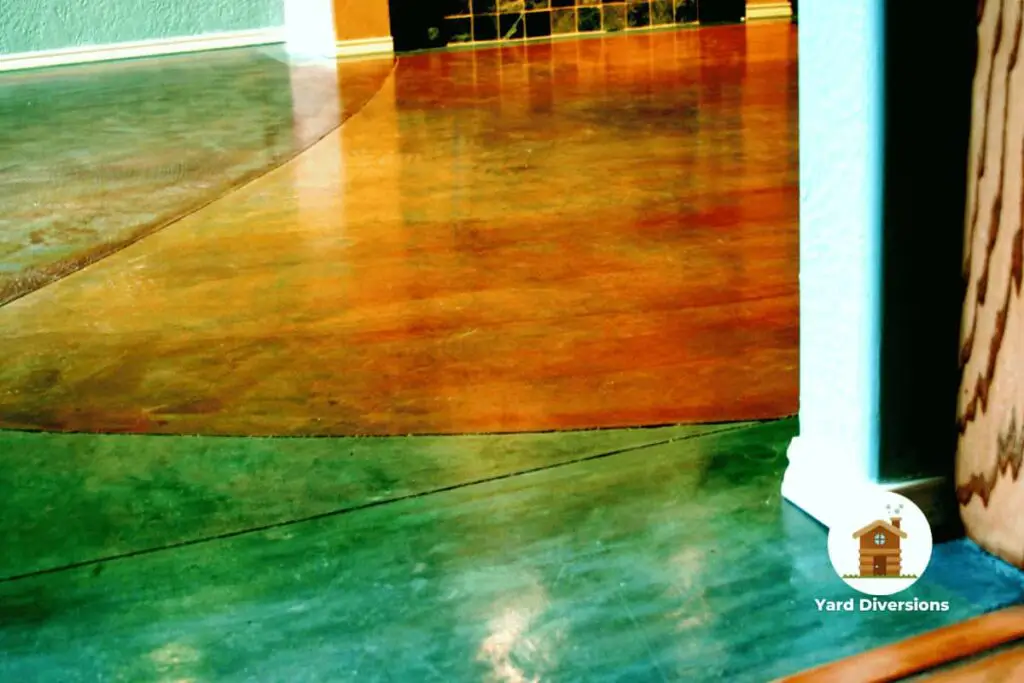
Blend and Layer Colors
When you blend and layer colors, you can create unique designs that elevate the look of your concrete patio. Choose stain colors carefully to match your desired aesthetic, and consider experimenting with different application techniques such as spraying two colors at once.
This approach can result in a marbleized effect, adding depth and interest to your outdoor space.
Choosing Stain Colors
Blending and layering stain colors on your concrete patio can transform it into a stunning visual centerpiece. Staining concrete allows you to mix and match different hues to create a marbled appearance or a customized design that reflects your personal style. To achieve the best results, carefully consider your color choices.
When choosing concrete stain colors, follow these guidelines:
- Complementary Colors: Select colors that are opposite each other on the color wheel. This contrast can enhance the visual appeal of your patio and create an eye-catching effect.
- Monochromatic Scheme: Use different shades of the same color. Layering colors in this way can add depth and dimension without overwhelming the space.
- Natural Tones: Opt for earth tones and natural shades. These colors tend to blend well with outdoor environments and can give your patio a timeless look.
Experimenting with various color combinations can yield a unique and artistic finish. You can layer different colors to achieve a rich, variegated effect, making your patio stand out. Remember that the key to a successful color blend is balance—too many contrasting colors can become chaotic.
Application Techniques
Applying concrete stain involves several techniques that can help you achieve vibrant color blends and layered effects. To start, you’ll want to blend multiple colors of stain to create a unique and custom look on your concrete patio. Layering different colors can give you a marbleized effect, adding depth and dimension to the surface. One effective method is to experiment with spraying two colors simultaneously. This technique allows the colors to mix naturally, creating organic patterns.
Here’s a table to summarize these application techniques:
| Technique | Description | Benefit |
|---|---|---|
| Blend Multiple Colors | Mix stains to achieve a custom look | Unique and personalized design |
| Layering Different Colors | Apply layers to create a marbleized effect | Adds depth and dimension |
| Experiment with Spraying | Spray two colors simultaneously | Organic, natural patterns |
| Touch Up Bare Spots | Apply additional stain to uncovered areas | Ensures even coverage |
After you’ve applied the stain, remember to touch up bare spots to guarantee even coverage and color consistency. Finally, to protect the stained concrete, it’s crucial to apply a new coat of sealer every three to four years. This step will help maintain the appearance and longevity of your patio. These application techniques will ensure your concrete patio looks professional and vibrant.
Seal the Surface
To protect your stained concrete patio and guarantee its durability, seal the surface with a high-quality concrete sealer. Sealing the stained concrete creates a protective barrier that shields it from foot traffic and stains, ensuring the longevity of your hard work. Follow these steps to apply sealant effectively:
- Choose the Right Sealer: Select a high-quality concrete sealer recommended by the stain manufacturer. This ensures compatibility and provides excellent protection.
- Prepare the Surface: Make sure the stained concrete is completely dry before applying the sealer. Any moisture can prevent the sealer from adhering properly.
- Apply the Sealant: Use a paint roller or sprayer to apply an even coat of the concrete sealer. Work in small sections to ensure full coverage and avoid puddling.
Allow the sealer to dry according to the manufacturer’s instructions, usually 24-48 hours, before exposing the patio to foot traffic.
Sealants not only enhance the appearance of stained concrete but also provide a strong, durable layer that resists wear and tear. This protective barrier is essential for maintaining the vibrant look of your patio and making it last for years to come.
Maintain Your Patio
Maintaining your patio requires regular cleaning, proper application of protective sealants, and seasonal upkeep. Start by sweeping debris and washing the surface with a mild detergent to keep it looking fresh.
Reapply a thin coat of EasySeal™ as needed, and inspect for any wear or damage, especially before and after seasonal changes.
Routine Cleaning Tips
Maintain your stained concrete patio looking its best by regularly sweeping away debris and dirt. Regular upkeep guarantees your patio remains inviting and prolongs the life of the stain.
To keep your concrete patio in top shape, follow these routine cleaning tips.
- Daily/Weekly Cleaning: Regularly sweep or use a leaf blower to remove leaves, dirt, and other debris. This prevents scratches and buildup that can dull the stain.
- Prompt Stain Removal: Clean stains promptly with a mild detergent and water. For tougher stains, use a concrete cleaner specifically designed for stained surfaces. Avoid using harsh chemicals, as they can damage the stain and sealer.
- Annual Deep Cleaning: Pressure wash your patio annually to remove stubborn dirt, grime, and mold buildup. Use a pressure washer on a low setting and follow up with a concrete cleaner for a thorough clean.
Protective Sealant Application
After making sure your patio is clean, apply a protective sealant like EasySeal™ to enhance its durability and safeguard the stained surface. Start by using a fresh pump-up sprayer to evenly apply the sealant. Make certain you apply protective sealant in thin coats to avoid puddling, which can lead to uneven coverage and potential damage.
Allow a drying time of at least 8 hours between each coat. This ensures the sealant properly cures, providing maximum protection.
Before applying a second coat, check the sealant’s cure by gently scratching the surface. If the sealant is fully cured, it won’t scratch easily.
To maintain your sprayer’s efficiency and longevity, make sure to clean the sprayer with Xylene after each use. This step is important in preventing the buildup of residue that can clog the sprayer and affect future applications.
Seasonal Maintenance Practices
To maintain your stained concrete patio looking its best, regularly sweep off debris and clean any stains using a concrete cleaner. Following a seasonal maintenance schedule will help you preserve the beauty and durability of your concrete floor.
Here are three essential steps you should take:
- Sealant Application: Every three to four years, apply a fresh coat of sealant to protect your stained concrete from wear and tear. This will enhance its appearance and longevity.
- Concrete Floor Polish: Periodically, use a concrete floor polish. This not only boosts the visual appeal of your patio but also adds a protective layer against foot traffic and potential stains.
- Safety Enhancements: Consider adding a slip-resistant additive like H&C SharkGrip to your stain. This improves safety, especially during wet or icy conditions.
In addition to these practices, don’t forget to inspect your concrete patio for any cracks or damage at least once a year. Addressing minor issues promptly can prevent more significant problems later on.
Conclusion
By following these steps, you’ll achieve a professional-looking stained concrete patio.
Start by gathering your materials and thoroughly cleaning the surface. Repair any cracks and test for absorption before choosing your stain.
Apply the stain carefully, blend and layer colors as needed, and then seal the surface.
Finally, maintain your patio with regular cleaning and occasional reapplication of sealant.
With these methods, your patio will look great and last for years.
